Note: This module is currently in development and may change at any time. We will endevour to keep this guide up to date as changes occur.
Using the Class Calendar Module in My Studio Manager
The Class Calendar module allows you to organise, display, and manage your classes in a clear, structured way — both inside your system and on your website (if you use the registration widget). This guide will walk you through creating Groups, Categories, and Calendars, plus setting up schedules, attendance, and pricing.
From the Class Configuration screen, you’ll find Group Configurations.
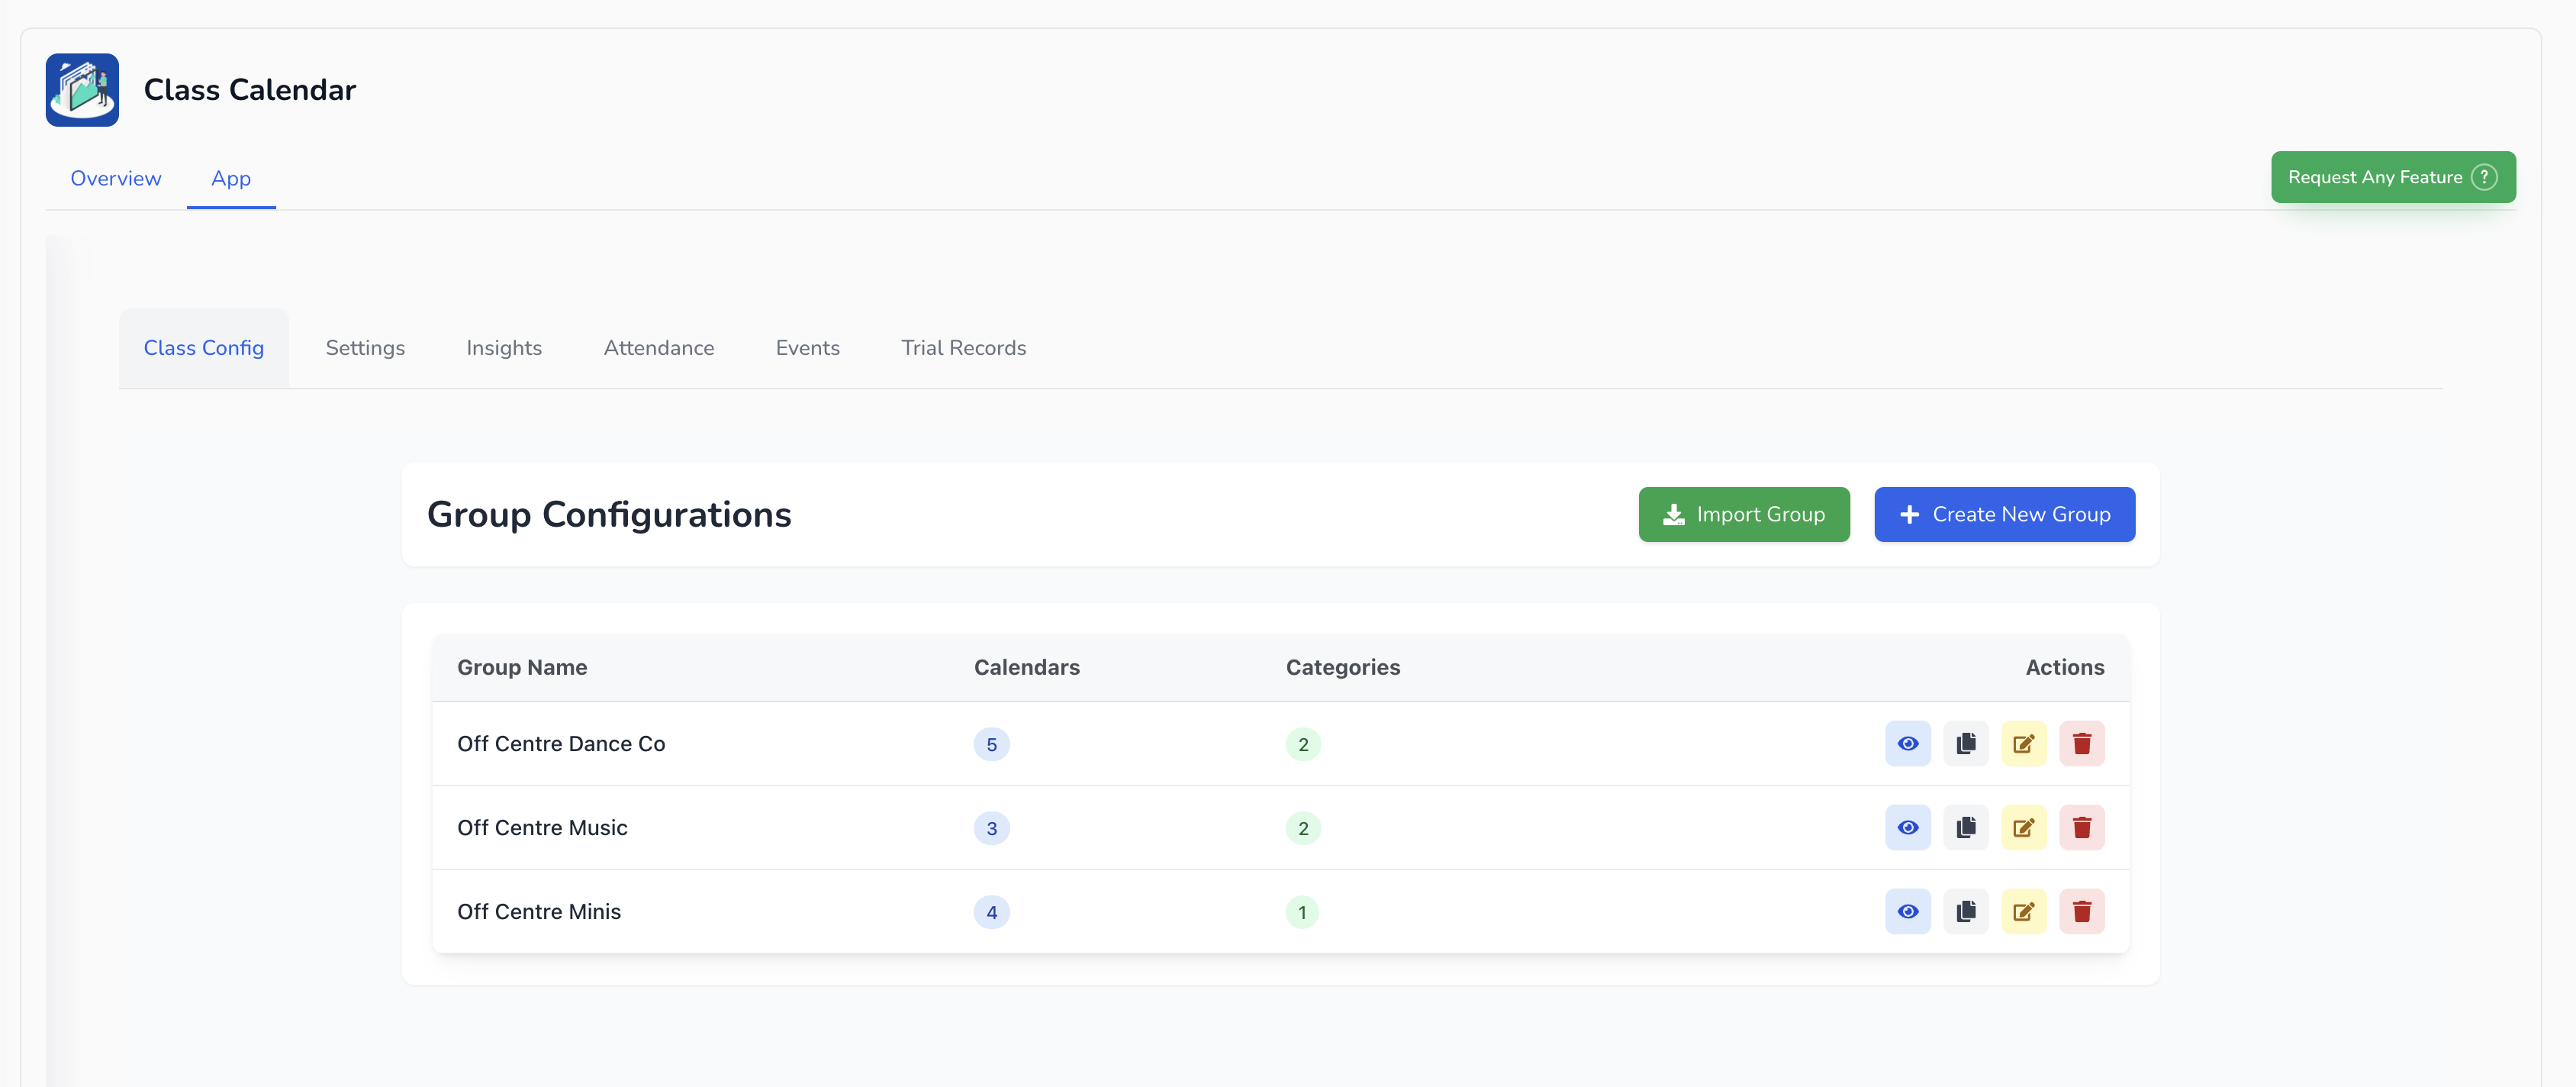
Here, you can:
Import an existing group from your current calendar, or
Create a new group.
Groups are essential for organising and categorising different calendars (e.g., by location, age group, or program). These groups also control how classes appear on your website if you use the registration widget.
Click Create New Group.
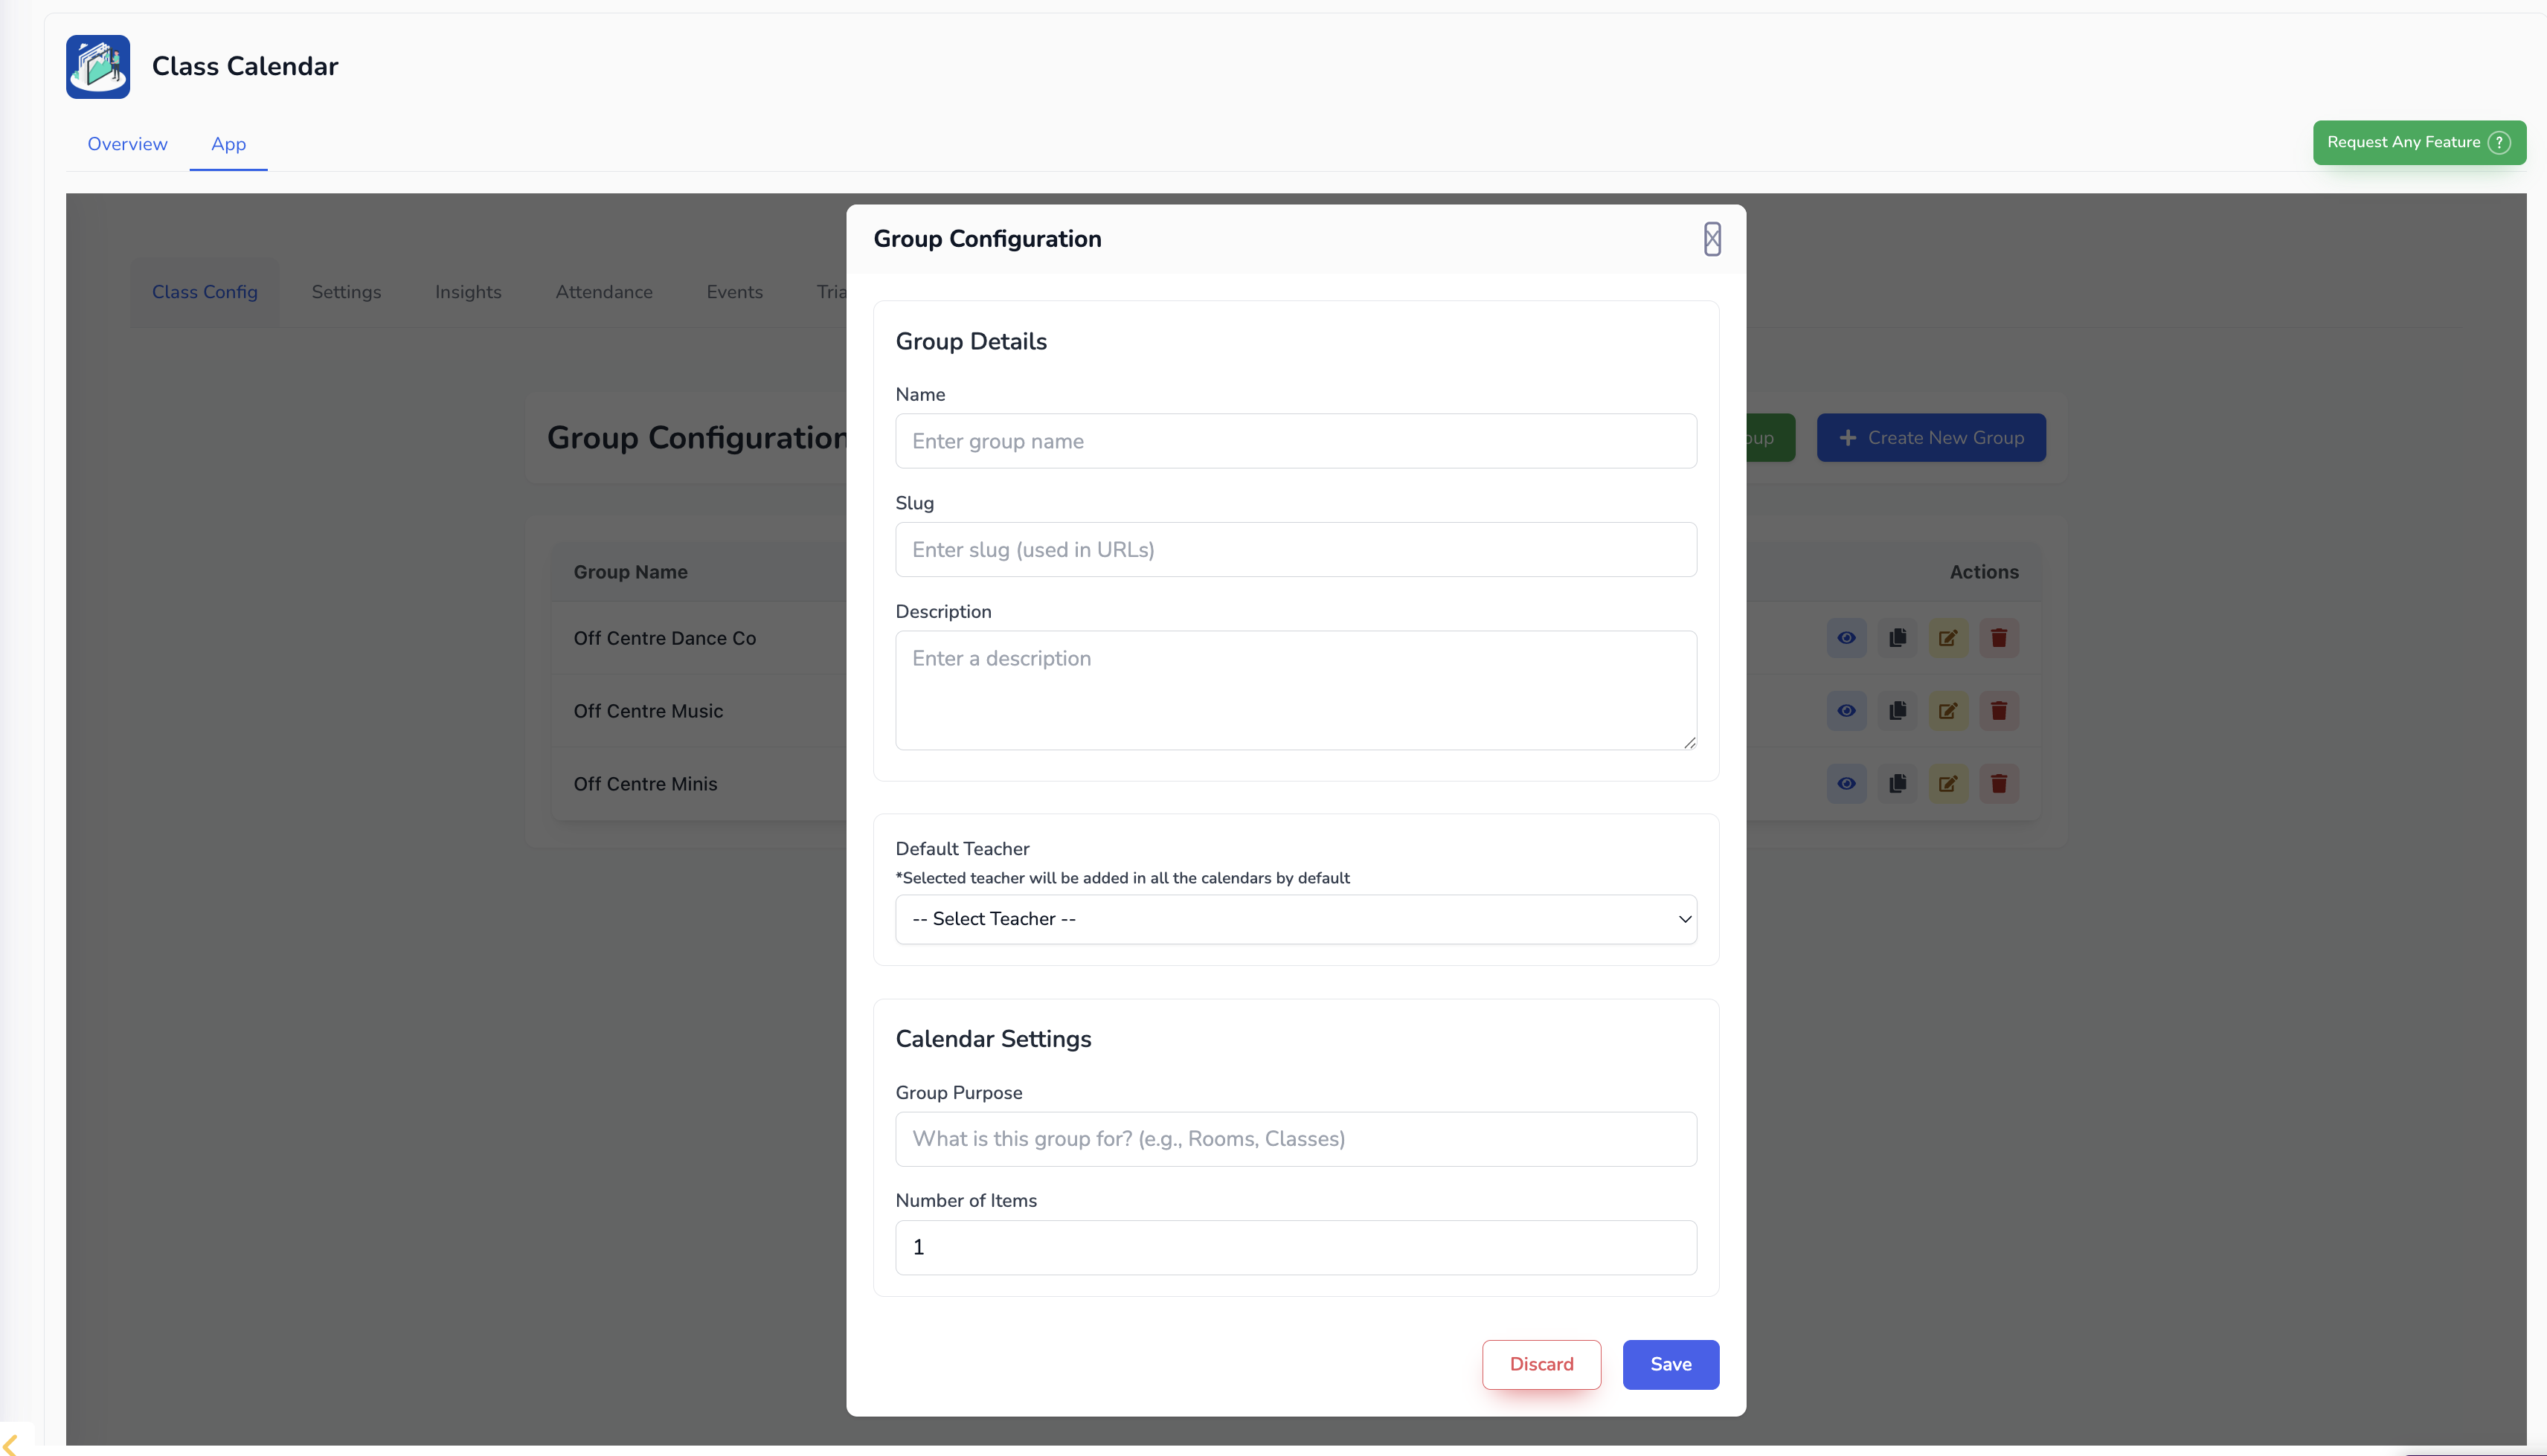
Enter a Group Name (e.g., Studio One, Minis Program, Ages 8–10).
Recommendation: Use either your class age groups or your studio locations as group names.
Add a Slug — this will appear in the class URL (e.g., yourstudio.com/off-centre-minis).
Add a Description (e.g., “Join our Off-Centre Minis class”).
Select a Default Teacher from your current users.
To add new users, go to Settings → Staff and add your team members.
You can leave this blank and update later.
Set the Group Purpose and Number of Items (This will create the the number of calendars/classes you want for this group for you to edit).
Click Save. Your new group will appear in the list.
To edit a group later, click the yellow pencil icon.
Inside a group, you’ll see:
Categories — further breakdowns of your classes (e.g., age levels within a program).
Calendars — your classes
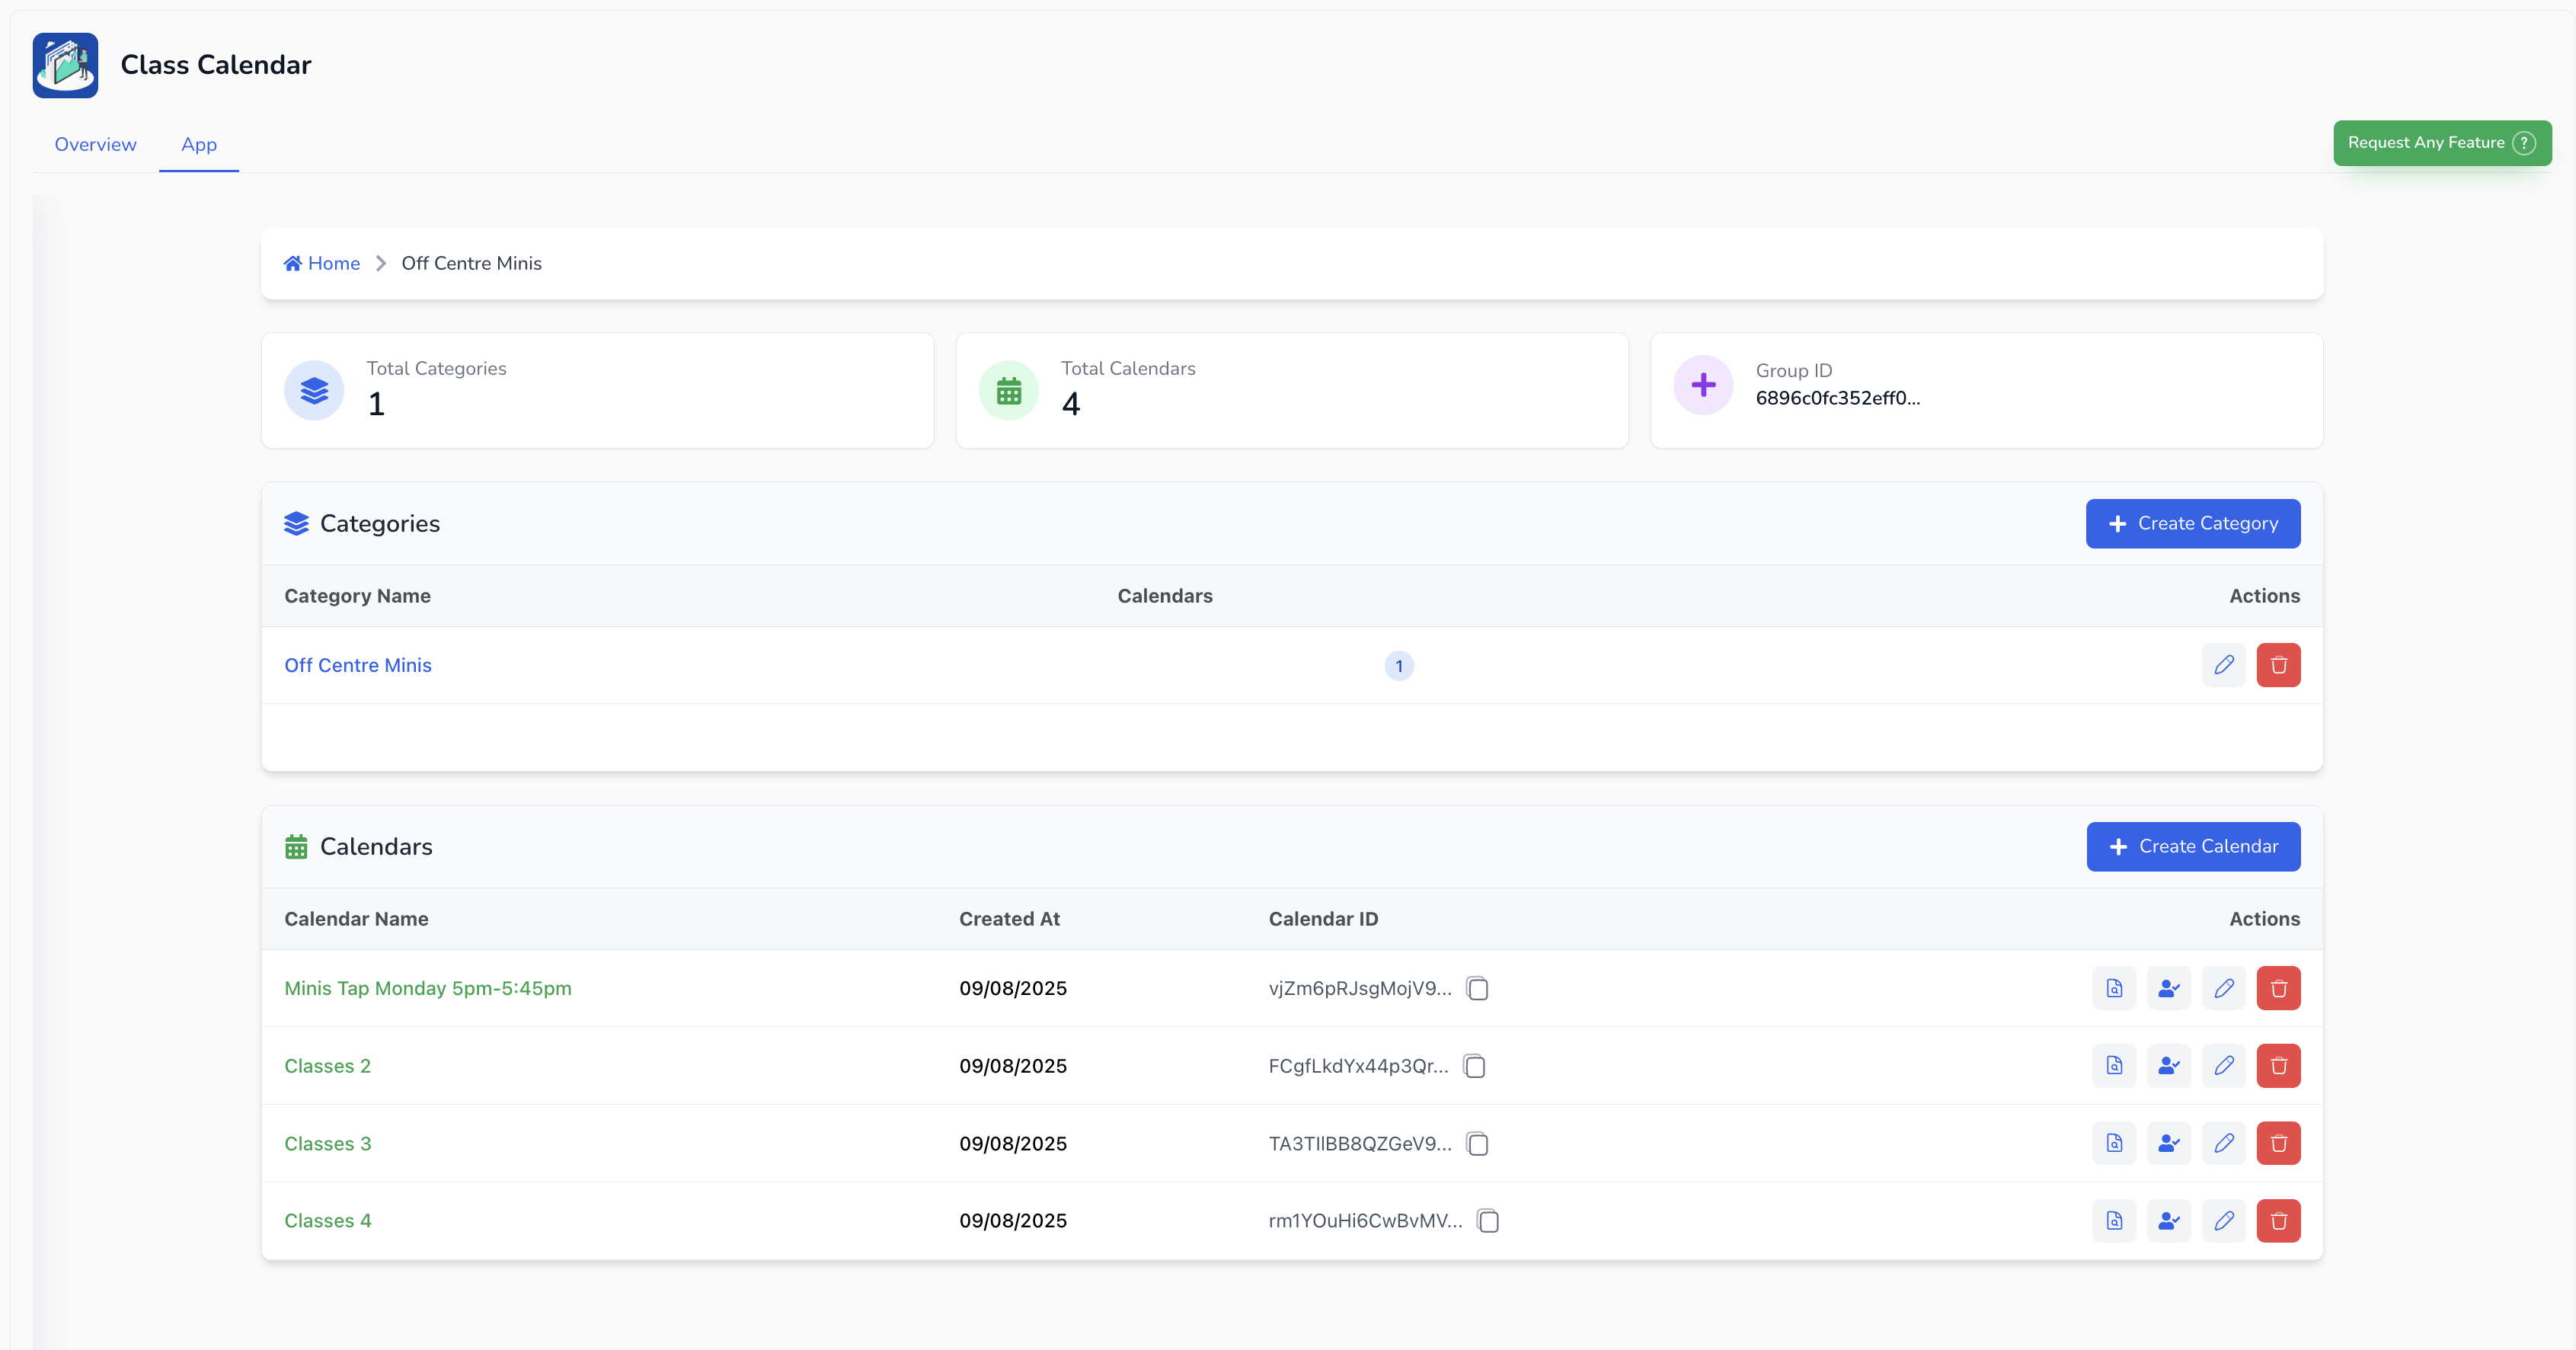
You can:
Edit existing calendars using the pencil icon
View attendance using the document icon
Mark attendance or create an external calendar attendance link using the person icon
Assign to a Category.
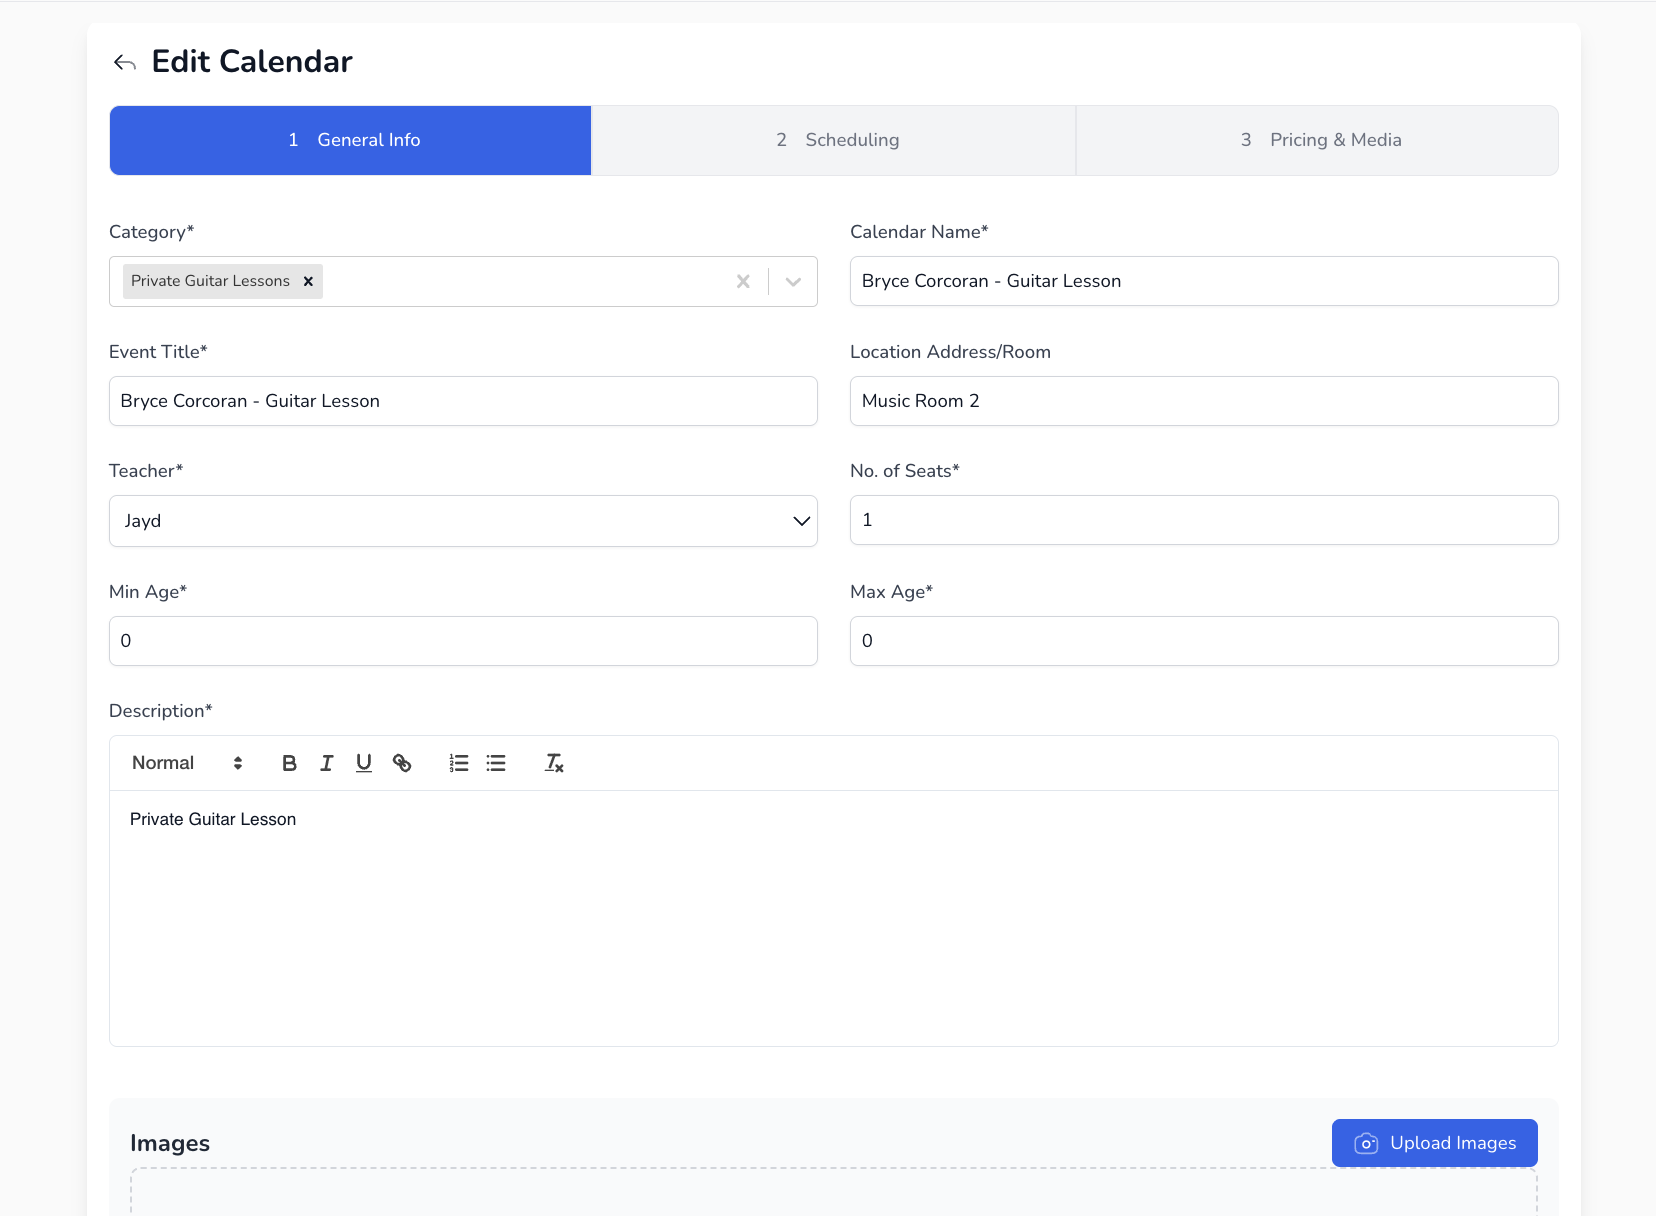
Enter the Calendar Name — recommend using Class Name + Day + Time (e.g., Minis Tap Monday 5:00–5:45pm).
Event Title — can be the same as the calendar name (appears on certain website widgets).
Calendar Address — enter your studio room/location (e.g., Studio 2).
Teacher — select the primary teacher for the class.
Number of Seats — maximum students before the class shows as full.
Set Minimum Age and Maximum Age for the class. This will prevent students enrolling into the class who are not the correct age for it.
Add a Description and optional Image (shown on your website).
Click Continue.
Selection Type – leave as Custom selection or choose Season wise if you want to schedule within a season. If you select Season wise, click Add Season, and specify the recurrence (daily or weekly). The system fills the date range automatically

Custom Selection
First Lesson Date — the start date (e.g., Monday 11th).
Start Time & End Time — set exact times (e.g., 5:00pm–5:45pm). End time will appear once you have set the repeat scheduling.
Set your repeating schedule for this class — select until the end of the term or year.
Use Add to Group to name each term (e.g., Term 3, Term 4).
When setting up the next term/year, you can transfer students from one term to the next.
You can also remove individual instances of a class from the groups for weeks where the class does not run by clicking on the X in the blue boxes.

Trial Class Settings — controls how this class appears for trials on your website (can be changed later).
Booking Fee — per-class fee. Leave blank if you plan to set an overall booking/trial fee later.
Default Prices - Use this to create the pricing for the event or class
Advanced Pricing – toggle to create per‑event or per‑season prices (useful for packs or series). For example, you can set a price for the entire season or for a grouped event using the drop‑down options.

Click Save when done.
Repeat the process for each class you want to add.
Your classes will now be:
Organised in groups and categories
Displayed correctly in your calendar
Ready for website registration and attendance tracking
