Generate new invoices directly from your CRM to efficiently bill contacts for their purchases of your products and services. This seamless integration streamlines the billing process, allowing you to manage customer relationships and financial transactions easily, ultimately enhancing your business operations.
To create a new invoice, go to the Payments section in your CRM, hover on Invoices & Estimates, click on the +New button, and click on New Invoice in the dropdown to begin the process.
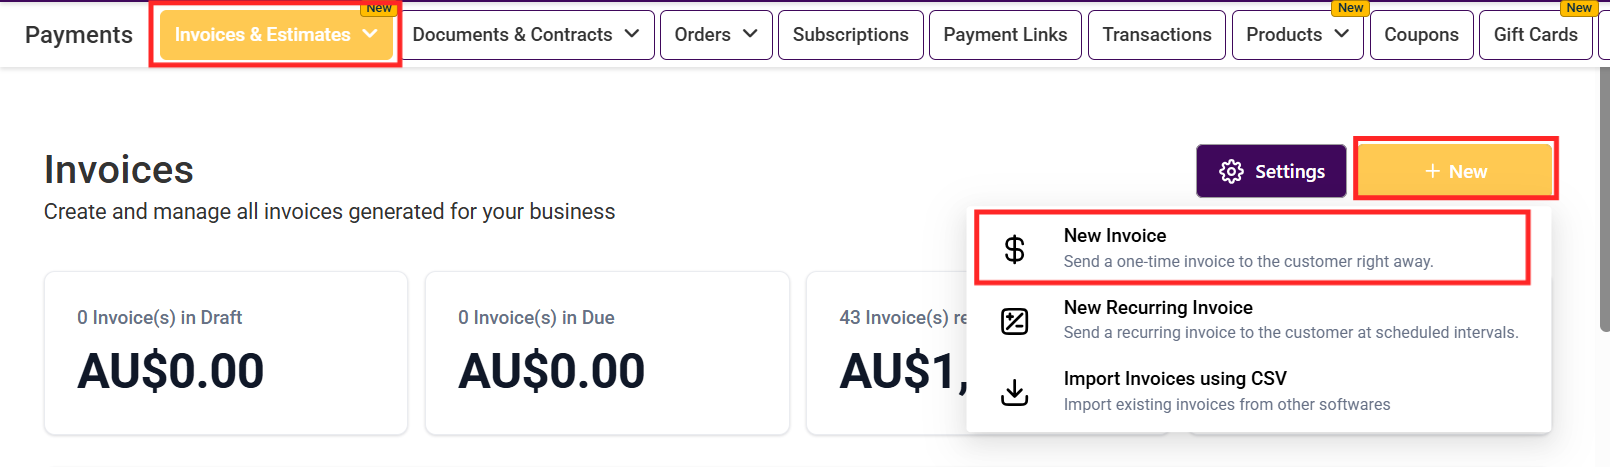
Upon clicking the +New button and selecting New Invoice, you'll be directed to the invoice editor page.

This is where you can customize the name of your invoice, which will be visible in the invoice list. Assigning unique names to each invoice is particularly helpful when managing a long list of invoices in your system, as it allows for easy identification and organization.

To add information to your invoice, follow the steps below!
Business & Customer Information: To add your business information saved in your CRM, click the pencil icon.
Customer Information: Edit or clear a customer, using the select customer dropdown.
Invoice Settings: Here you can add the Invoice number, Issue date, and Due date.

Adding Products: To add products, click "+Add more Products" from your products tab; once added, you can edit the price and quantity by clicking on them, add taxes for your products or services, and provide your customers with a clear breakdown of the total amount and the tax included, along with the subtotal for each selected item. Add products within existing line items for ease of arrangement by clicking on the "+" icon.

Subtotal: The subtotal sums up the total amount from the selected items. In this area of the invoicing process, you can also add discounts, tax, and a payment schedule.

This section allows you to add and edit notes and terms and conditions, tailoring them to your specific goals for each invoice.
Terms and Conditions:
Charge Late Fees: This option helps you apply late fees for overdue payments, ensuring customers are notified of additional charges for delayed payments. You can set a flat fee in your currency, and add the frequency, grace period, and maximum late fees. You can also set a percentage of the late fees to be paid. Also add the frequency, grace period, and maximum late fees.
Include Tipping: It enables you to configure tip settings for this invoice, allowing customers to add a gratuity if desired.
Add Attachment: In this Section, you can attach up to 10 files (totaling 20MB) to an invoice. This allows you to include additional documents such as specifications, terms, or visual materials for added clarity and flexibility.

The right side of the invoice automatically updates to reflect changes made on the left side, providing a real-time preview.

These options give you extra flexibility to manage the invoice you are creating. This includes:
Preview.
Record Payment.
Convert to Template.
Manage Payment Methods.

This option shows how an invoice will appear in its current state after you've modified it and wish to preview it before making further adjustments or sending it to your customer. This enables you to ensure that the invoice meets your expectations and properly reflects the necessary information before sharing it with your customer. The preview looks like the following:

Use this option to manually enter a payment made by the customer outside the CRM (like cash or check) to keep your records complete.

If you frequently create similar invoices, you can save this invoice as a template. It streamlines future invoicing by providing a ready-made format.
Charge a Card: This allows you to record payments made through a card.
Record Manually: Allows you to record the payment made via cash cheque or bank transfer.
This option allows you to set up a new card for payment. When you're using the card for the first time, you would need to add it to the system before you can charge the card.

Fill in the necessary card details to add a new card. Click the Confirm & Charge button to continue.

Select this option when you already have saved a card in the system that you would like to charge for the payment. If you have more than one card saved in the system then you will be provided with the option to choose one of the cards from the list.
Customers being charged will not receive any automated email or text confirmation.

To receive any payments done via credit/debit cards, you would need Stripe connected to your CRM. In case you don't have your stripe setup, you can use the "Record manually" option.
 NOTE: If you opt to use invoicing without Stripe Connect you will be required to manually record and collect payments.
Recording manual payments without Stripe Connect is available only for one-time invoices, and no automated email or text confirmation will be sent to customers. There are various methods to receive payment with this option:

Select this option for cash payments and type in the exact amount in the space provided for it. You can also add notes for your records.

This lets you take the payment through a card by selecting the type of card (Visa/Master), and the last 4 digits of the card (in case you have already saved the card in the system). Type in the exact amount in the space provided for it. You can also add notes for your records.
However, to receive any payments done via credit/debit cards, Stripe Connect is needed.

Select the check option from the dropdown menu and enter the check number when your customer has opted for check payment. Type in the exact amount in the space provided for it. You can also add notes for your records.

Apart from cash checks and cards, you can also go for bank transfers or another medium. Type in the exact amount in the space provided for it. You can also add notes for your records.

If you opt to use invoicing without Stripe Connect you are required to manually record and collect payments.
The Saving Invoice feature allows you to save any changes made to an invoice, ensuring your modifications are securely stored.

Once the invoice has the recipient's information and other necessary details, use the Sending an Invoice tab to deliver it to your contact.

Invoices can be sent through email or text; a test mode is available for verification. To switch between live and test modes, click on the advanced option.

The Copy and Mark as Sent tab is useful when you want to duplicate an existing invoice for future use and mark the original invoice as sent. This streamlined process enables you to perform both actions with a single click, saving time and effort.

The Add Customer feature is ideal for storing contact information in your CRM for ongoing use and streamlining invoicing.

To create a new contact, simply fill out the required information and save the changes. This ensures that your customer's details are readily available whenever needed.

The Full Customer List allows you to view and scroll through all existing CRM contacts, making it easy to select one for invoicing purposes.

Additionally, the Editing Customer Information Manually function permits you to modify your customer's information as necessary. This is particularly helpful when adjustments are required for invoicing purposes, ensuring accurate and up-to-date records.


If you've accidentally added incorrect contact information, the Clear Customer option enables you to delete it and add the correct details swiftly.

The Enable Tax feature enables you to include taxes for your products or services, providing customers with a clear breakdown of the total amount and taxes included in the final price. You can enable tax automatically and manually.
Easily set your invoice to automatically include the right tax rate for everything you’re charging, so you don’t have to do it manually.

Choose and apply the tax rate for each product or service one by one, which is helpful if different items have different tax rules.

Add a tax rate to the total amount of your invoice all at once, instead of adding tax to each item separately.

To select a tax, simply check the appropriate box to add the chosen tax to your invoice.

Here you will see the name you have given to the individual tax.

Here you will see how much tax is applicable for each tax in the list.

This will show the Tax ID number you have created for each type of tax in the list.

The Add Discount feature allows you to apply discounts to your invoices, ensuring that any special offers or promotions are accurately reflected in the final total.

Choose between a percentage-based discount or a custom amount.
You can set the discount rate manually, with the exact percentage displayed in the box.

Choose this option to apply a fixed discount amount instead of a percentage. Type the exact amount of the discount. Click "Save" to confirm and apply the discount to the invoice.

Using your CRM for invoicing simplifies billing, keeps records accurate, and speeds up payment processing. Customizable options for templates, taxes, discounts, and payment methods allow you to personalize invoices and manage finances efficiently.
